
![]()
![]()
![]()
![]()
![]()
![]()
|
|
|
Pont de dion à carrossage réglable
http://www.bianchi-kopp.de/BK-041001/bk-motorsport/ms-produktliste.html source :http://www.alfabb.com/bb/forums/milano-75-1987-1989/27358-roxanne-budget-milano-75-track-car-79.html
Rear camber and toe in
So,
finally some progress on the car... Next race is in March and with the
new front alignment (almost -4 degree camber) the rear needed
adjustment. I was starting to consider to find a race shop to modify
the Dedion for rear camber and toe-in, but Colin and I decided to do it
ourselves since we finally had some time.
The idea is to add negative camber and widen track by 50 mm, and then trade of some of the extra rear grip with a stiffer (adjustable) rear sway bar to further reduce roll. When Ron was here we went over how he does it on the 75Experience Ring cars, and I picked up some pointers. Though, I opted for doing the rear camber and toe-in with the Dedion in the car although he suggested to pull it out. Anyway, some pics below. First Colin and I marked where the CV-joint of the half-shaft near the hub ends, and where the bolt heads end. You want to cut inside of those since the clearance between the CV-joint and the Dedion is minimal. To get a marking completely parallel with the zero degree camber, zero toe-in wheel, we conveniently dug up a board of proper thickness and held it against the backside of the rim/tire and marked the Dedion _all_ the way around. Getting the marking right and following it during the cutting is critical to make the job easier. For zero degree toe-in you also want to mark equal depth cutting on both sides. Since I wanted 2 mm toe-in (per wheel) we needed to cut slightly deeper on the front side than the rear side. 
The
cutting is somewhat challenging. Mostly because access isn't great. It
would perhaps be slightly better, although not much, with the Dedion
out of the car (we will know soon since we will probably do Colin's out
of the car). To get the cutting done we used two angle grinders. A
small that takes 3" blades, and a bigger that takes a 7" blade. We
ended having to also put a 10" blade on it to reach the bottom part of
the front cut.
From the lowest original mark we gradually cut deeper, in increments of 1/4" since we did want to cut so far that the hub would be too "loose". We used the weight of the car (by jacking up the hub-end of the Dedion) to achieved sufficient leverage to bend the tube. The final depth is shown on the closed-up picture where the gap at the top is completely closed. 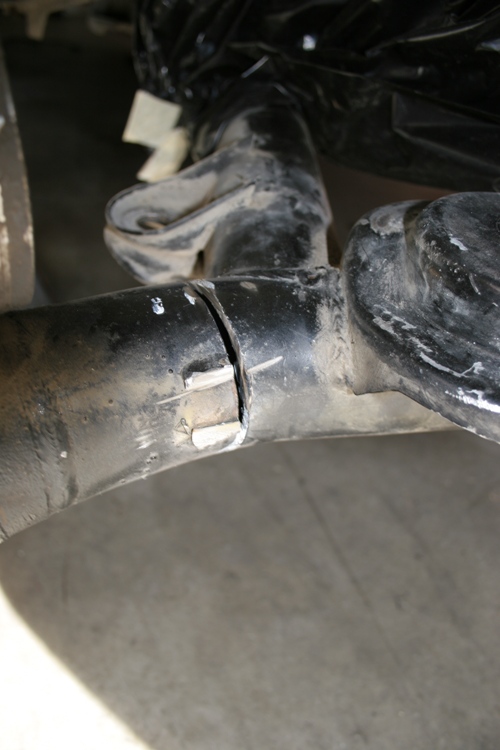
Two BIG advantages of doing it with the Dedion in the car is that: 
And
some pictures with the final setting of the rear (left side) camber and
toe-in. I ended up with slightly more negative camber than planned
(almost -4 degrees, I was aiming for -3 degrees), but we got the toe-in
spot on - 2 mm toe-in.
On these pictures I still did not put my 25 mm H&R aluminum spacers that I got from Jason to the rear (they maintain the 58.6 mm bore and 5x98 bolt pattern - TUV approved). On the front I added more than 1 cm of spacer to the lower control arms to get the negative camber. That increased the front track. On the rear we cut away material to get the negative camber, hence the reason for the 25 mm rear spacers. So, unless I only want to run clock-wise ovals I need to find time to do the right side 

") 
|


